Tucky Center is a solution for remote monitoring of patient physiological parameters, enabling you to track changes in these parameters in real time and be alerted if thresholds are exceeded.
1. Platorm access
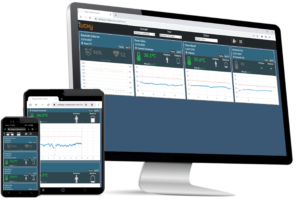
Tucky Center is a SAAS platform accessible from any web browser.
To connect, go to: https://tuckycenterfrontend.azurewebsites.net
and log in with your FranceConnect or ProSantéConnect (caregivers) credentials.
2. Interface description
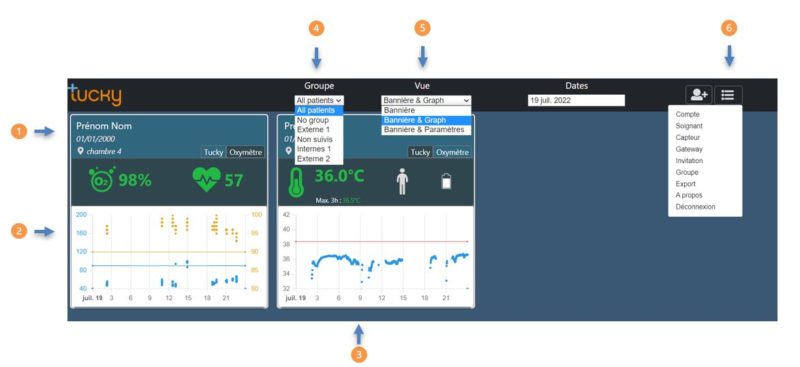
- Patient information
- Example of heart rate / SPO2 curve
- Example of temperature curve
- Choice of group to display
- Choice of view to display
- Configuration menu
2. Sensors
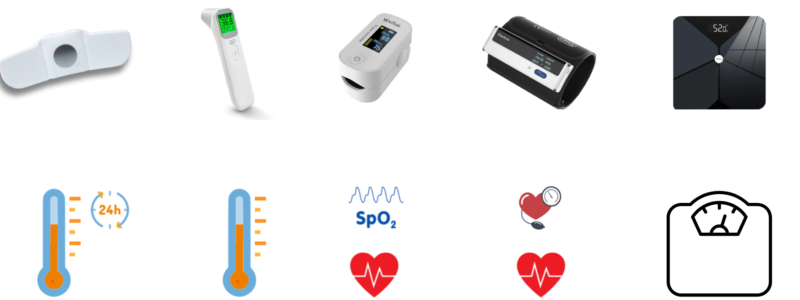
Tucky Center uses the following connected medical devices:
- Tucky patch thermometer
- Infrared thermometer
- Pulse oximeter
- Blood pressure monitor
- The scale
3. Gateway
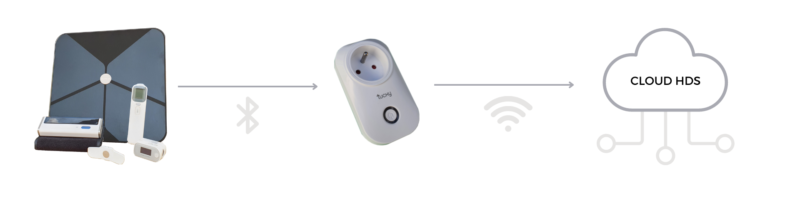
The Gateway uses the wifi to transmit data to the HDS Health Cloud. There are different ways to connect it.
- Automatic Wifi setup :
![]() Use the WPS mode of the internet box to automatically connect the Gateway. Press the button on the box then plug in the Gateway.
Use the WPS mode of the internet box to automatically connect the Gateway. Press the button on the box then plug in the Gateway.
- Manual Wifi setup :
Via smartphone :
– It is possible to set the Wifi thanks to the phone application ESP BLE Provisioning
– To do so :Download and launch the app,Click on “provision new device”, and “I don’t have QR code”
– Delete the prefix if necessary, and scan againSelect the Gateway, set Wifi & Password. Connection will be automatic.
Via computer :
Manual configuration is done via a web interface accessible for 15 minutes after plugging in the Gateway.  This appears as an access point in accessible WiFi networks, under its number “TUCKY-GW_XXXX” (see label).
– Connect to it, using the security key if necessary
– Open a browser and enter the following address :
– Enter Wifi SSID and password, and validate
- Meaning of the DEL:
- Green: gateway connected
- Flashing green: data transmission in progress
- Red: Gateway not connected
- Purple: Connected
4. Adding sensors / Gateway
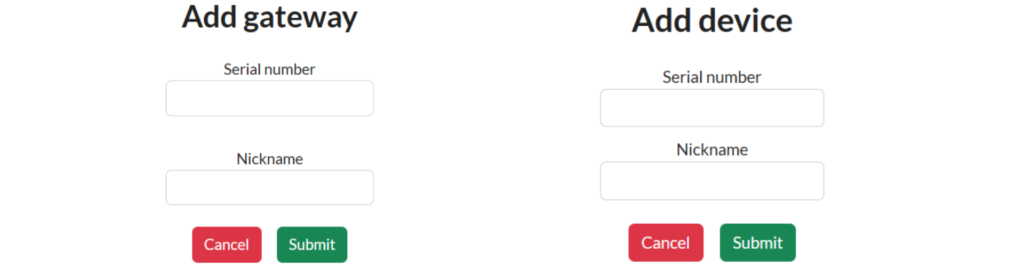
Each Sensor/Gateway must be declared in the platform via its serial number, which is available on the product and on its packaging.
- Adding a sensor :
In the Tucky Center configuration menu, click on “Sensor”.
– Press “Add” and enter its serial number.
– Enter a nickname (optional).
- Adding a gateway :
A gateway is added in the same way as a sensor, by clicking on “Gateway” in the configuration menu.
5. Patient management
Patient data is managed in 2 ways:
– Internally: data is stored in the facility’s account
– Externally: data is stored in the patient’s account, which they share with the facility.
- “Internal” patient creation :
- Click on the “Add patient” button”

- Select patient creation from “This account”.
- Click on the “Add patient” button”
- Enter the patient’s e-mail address
An invitation e-mail is sent to the patient with instructions to follow
Création patient « externe » :
-
- Click on the “Add patient button”
- Create a profile from “an external account”
- Enter patient’s e-mail address
- An invitation e-mail is sent to the patient with instructions to follow.
- Click on the “Add patient button”
Once the invitation has been accepted, the patient’s profile appears on the TuckyCenter interface.
6. Sensors / Gateway / Patient Association
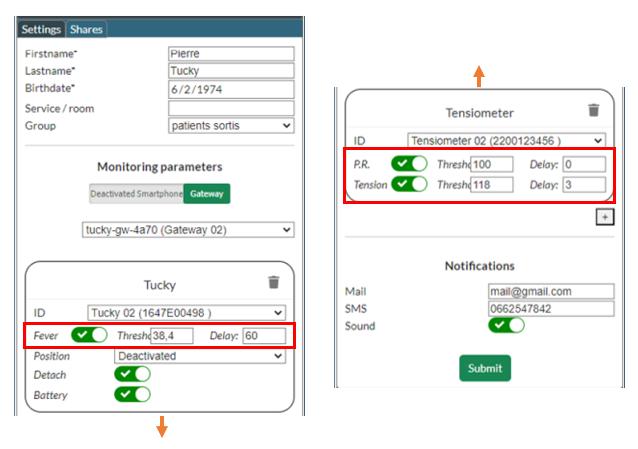
Sensors / Gateway / Patient association is made via the TuckyCenter interface.
- Select the “Banner & Settings” view
- Click on the “edit” icon

- In the “Activate tracking” section
- For smartphone tracking, choose smartphone
Note: Only available with the Tucky thermometer.
-
- For monitoring via Gateway, select Gateway then indicate the sensors and Gateway to be associated.
Note: Changes take 2-3 min to complete
This screen also allows you to configure groups, alert thresholds and times, desired alert modes, etc.